
Zapper Edge Entra ID Setup Guide
Introduction
As a software developer and business owner you want your team to start using Zapper Edge right away, but you also need to maintain control over authentication and branding. Zapper Edge is a cloud‑native, secure file‑transfer platform that you can deploy from the Azure Marketplace. When you first deploy the service, it comes with a default Microsoft Entra ID (formerly Azure AD) tenant so you can log in immediately. Later, you may decide to use your own Entra ID tenant so that you control the sign‑in experience and policies. This guide tells a clear story—from the default setup to creating your own tenant and wiring it into Zapper Edge through environment variables—so that your customers can use their own Entra ID.
Quick start with the default configuration
After deploying Zapper Edge from the Azure Marketplace, you can sign in immediately. The platform uses a shared Entra ID tenant maintained by Zapper Edge. Behind the scenes, your managed instance contains environment variables that point to this shared tenant. Two examples are shown below – one for evaluation and one for a sample customer. These variables live in the Azure App Service configuration and allow MSAL (Microsoft Authentication Library) to know where to send users during login.
ZAPPER_MSAL_CLIENT_ID=1c05ac21-a7ab-4815-84fb-41c2c6e277f8
ZAPPER_MSAL_AUTHORITY=https://zapperedgemft.ciamlogin.com/5045001d-bf72-4b9c-8c4d-31ab3c7549c3
ZAPPER_MSAL_KNOWN_AUTHORITIES=zapperedgemft.ciamlogin.com
# Example for a sample customer
ZAPPER_MSAL_CLIENT_ID=d5005803-ca0c-43cc-9c2b-99d1f27fd39d
ZAPPER_MSAL_AUTHORITY=https://samplezappercustomer.ciamlogin.com/d53589ae-5946-46c4-94ec-bd10656f5d89
ZAPPER_MSAL_KNOWN_AUTHORITIES=samplezappercustomer.ciamlogin.com
The default configuration is great for trials and proof‑of‑concepts because there is nothing to set up. However, you share the tenant with other Zapper Edge customers, and you cannot change branding or enforce your own conditional access policies. When you’re ready for production, you’ll usually want your own tenant.
Deciding when to use your own tenant
Consider switching to a custom Entra ID tenant when any of the following apply:
You need to integrate with existing identity or single sign‑on systems.
You want to customise the login page, add your logo or change the colours.
You must enforce enterprise policies such as multi‑factor authentication (MFA), device compliance or location‑based access.
You have compliance requirements that prevent using a shared tenant.
You can continue to evaluate Zapper Edge using the shared tenant while you prepare your own. The migration process is reversible because it is driven by environment variables.
Creating your own Entra ID tenant and application
Follow these steps to build your own Entra ID tenant and register a single‑page application for Zapper Edge. If you’re building a customer‑facing portal, Microsoft recommends using an External ID tenant (CIAM). If the users are your employees, you can use your existing workforce tenant and skip Step 2.
Prerequisites
An active Azure subscription.
Permission to create or register applications (Application Administrator, Cloud Application Administrator, or Application Developer with tenant setting allowing user app creation).
The URL where your Zapper Edge instance is deployed, for example https://your-zapper-edge.azurewebsites.net.
Step 1 – Sign in to the Entra Admin Center
Open https://entra.microsoft.com and sign in with an administrator account.
If you manage multiple tenants, click the Settings gear in the top menu and select the tenant where you want to work.
Step 2 – (Optional) Create an External Tenant (CIAM)
An external tenant isolates your customer identities from your workforce directory. To create one:
In the left menu of the Entra admin centre, navigate to External identities → External tenants and choose + Create new external tenant.
Choose Customer Identity and Access Management (CIAM) as the tenant type.
Enter your organisation name and a unique initial domain. The domain will take the form yourtenant.ciamlogin.com. Select your preferred geographic location for data residency, review the settings and click Create. Provisioning takes a couple of minutes.
The screenshot below shows the Azure portal page where you select a tenant type. Choose Microsoft Entra external ID for customer‑facing applications:
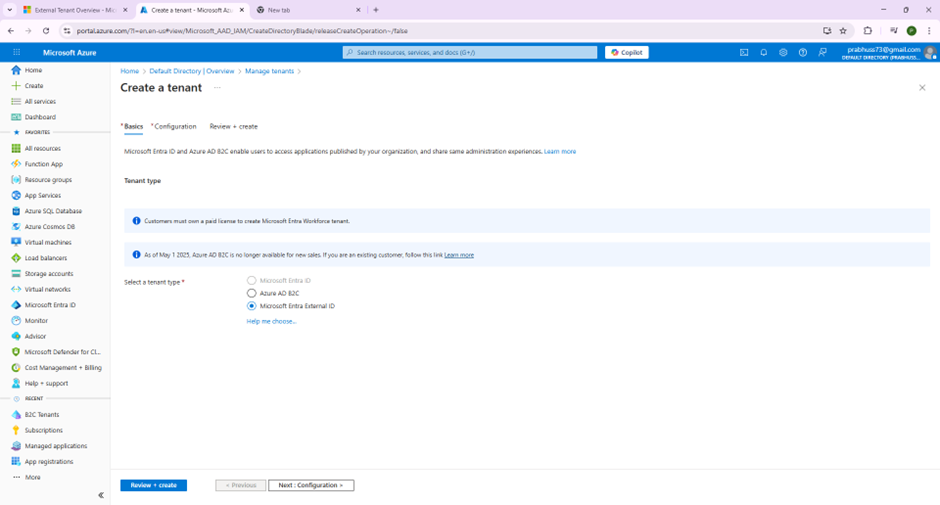
Creating an external tenant – select Microsoft Entra external ID from the list of tenant types
If you are using an existing workforce tenant instead, you can skip this step.
Step 3 – Register a new application
From the Entra admin centre, go to Identity → Applications → App registrations.
Select + New registration.
Give your app a friendly name, such as Zapper Edge Production.
Under Supported account types choose the scope that matches your audience. For most customer‑facing portals, select Accounts in any organisational directory and personal Microsoft accounts. For internal employee use, you might pick Single tenant.
For the Redirect URI, choose Single‑page application (SPA) and enter the URL of your Zapper Edge deployment. Example: https://your-zapper-edge.azurewebsites.net. Zapper Edge uses a browser‑based MSAL client, so the SPA platform type is required.
Click Register. You will be taken to the overview page for your new application.
The Authentication blade for your application should list your redirect URI under the Single‑page application section. You can add additional URIs later if you deploy in multiple regions. The following screenshot shows the authentication settings with two redirect URIs configured:
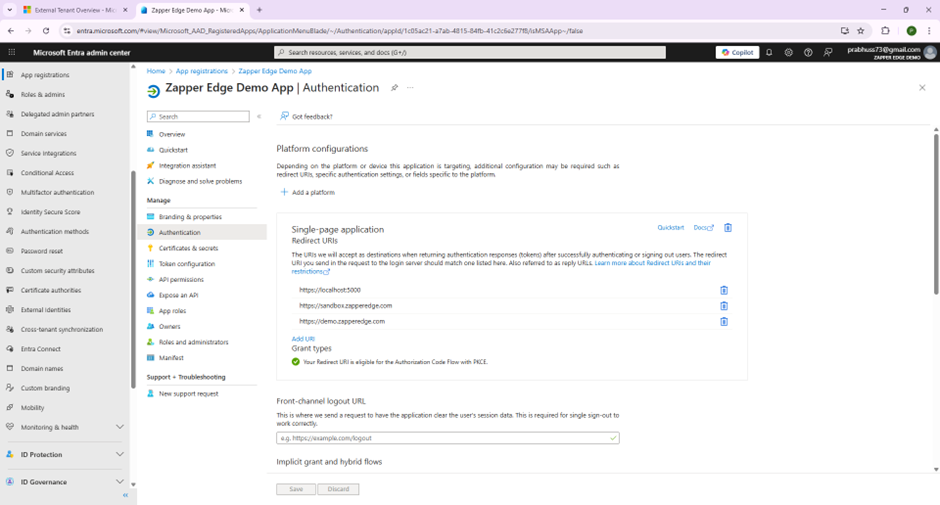
Authentication page showing a single‑page application and its redirect URI
Step 4 – Record your application and tenant identifiers
On the application’s Overview page, copy the following values:
Application (client) ID – this becomes the ZAPPER_MSAL_CLIENT_ID.
Directory (tenant) ID – used to build the authority URL.
Tenant domain – look at the primary domain listed. For external tenants, it will end with .ciamlogin.com; for workforce tenants it ends with .onmicrosoft.com. This becomes the known authority domain.
The overview page looks like this:
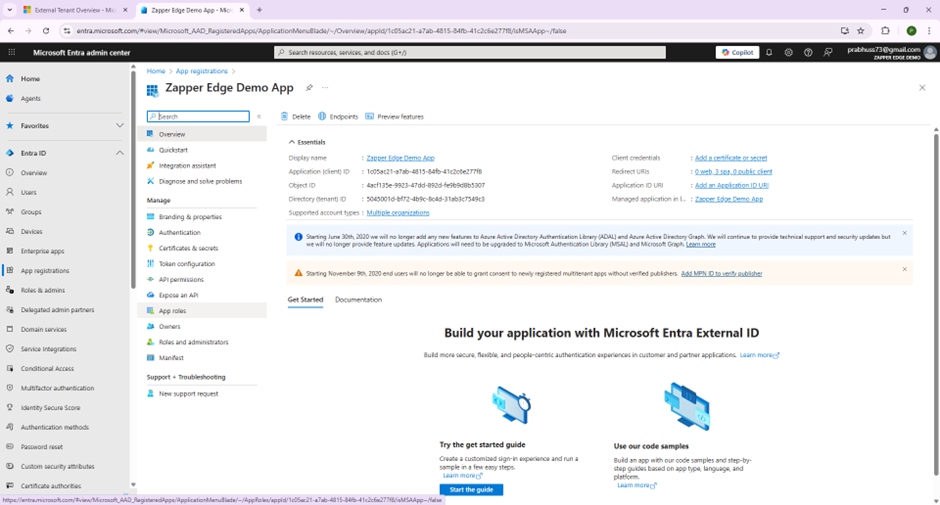
Make sure to store these values somewhere safe. You will need them when you update your Zapper Edge environment variables.
Step 5 – Create a user flow (for external tenants)
If you created an external (CIAM) tenant, you must configure at least one user flow so that customers can sign up and sign in. This example uses the built‑in sign‑up/sign‑in flow:
Navigate to External identities → User flows and select + New user flow.
Name the flow SignUpSignIn.
Choose which identity providers to allow (email, one‑time passcode, Google, Facebook, Apple, etc.). For email, you can enable password or passwordless options.
Choose which attributes to collect during sign‑up. Zapper Edge needs at least Display Name and Email Address.
Under Application claims, include Display Name, Email Addresses and the user’s object ID.
Create the flow, then select it, go to Applications → + Add application and add your newly registered Zapper Edge app.
Step 6 – Save your work
At this point your Entra tenant and application are ready. In the next section you will use the IDs you saved to update your Zapper Edge environment.
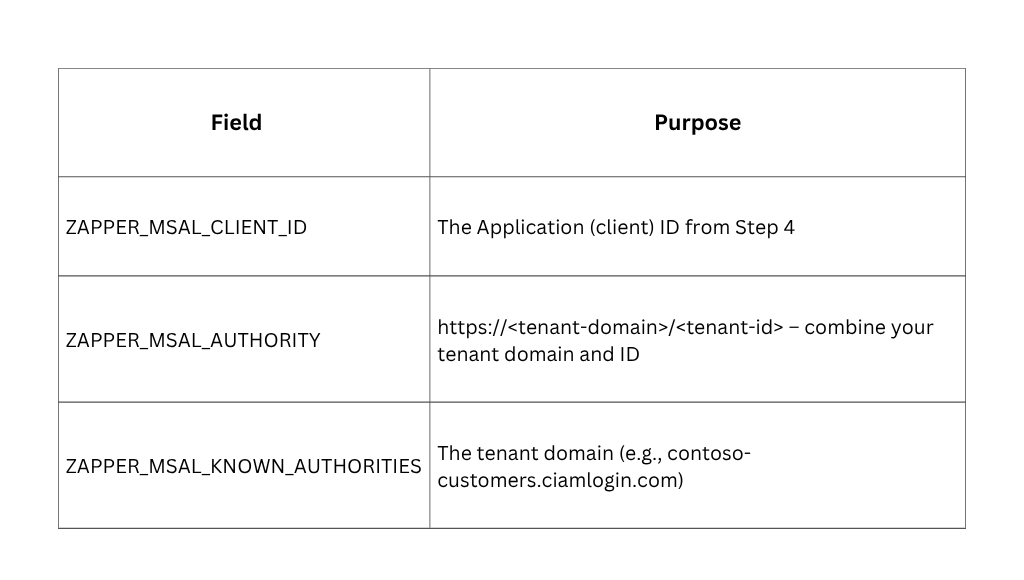
Configuring Zapper Edge environment variables
Zapper Edge reads its MSAL configuration from environment variables. There are three settings to update:
You can update these values through the Azure Portal, Azure CLI, or your infrastructure‑as‑code pipeline. Below are examples for each method.
Method 1 – Azure Portal
Go to https://portal.azure.com and locate your Zapper Edge App Service resource.
In the left navigation, choose Settings → Configuration.
Select + New application setting for each of the three variables above and enter the appropriate values.
Save and restart the app service so the new settings take effect.
Method 2 – Azure CLI
# Set variables
RESOURCE_GROUP="your-resource-group"
APP_NAME="your-zapper-edge-app"
CLIENT_ID="12345678-90ab-cdef-1234-567890abcdef"
TENANT_ID="abcdef12-3456-7890-abcd-ef1234567890"
TENANT_DOMAIN="contoso-customers.ciamlogin.com"
# Update settings
az webapp config appsettings set \
--resource-group "$RESOURCE_GROUP" \
--name "$APP_NAME" \
--settings \
ZAPPER_MSAL_CLIENT_ID=$CLIENT_ID \
ZAPPER_MSAL_AUTHORITY="https://$TENANT_DOMAIN/$TENANT_ID" \
ZAPPER_MSAL_KNOWN_AUTHORITIES=$TENANT_DOMAIN
# Restart the app to apply changes
az webapp restart --resource-group "$RESOURCE_GROUP" --name "$APP_NAME"
Method 3 – Infrastructure as code
In an ARM/Bicep template or Terraform module you can set the same values. For example, in an ARM snippet:
{
"type": "Microsoft.Web/sites/config",
"apiVersion": "2022-03-01",
"name": "[concat(parameters('webAppName'), '/appsettings')]",
"properties": {
"ZAPPER_MSAL_CLIENT_ID": "[parameters('msalClientId')]",
"ZAPPER_MSAL_AUTHORITY": "[concat('https://', parameters('tenantDomain'), '/', parameters('tenantId'))]",
"ZAPPER_MSAL_KNOWN_AUTHORITIES": "[parameters('tenantDomain')]"
}
}
Branding the sign‑in experience (optional)
You can customise the sign‑in page so that customers see your own logo and colours instead of Microsoft defaults. This step is optional but helps reinforce your brand and build trust.
In the Entra admin centre, select your tenant and navigate to Company branding.
Click + Configure or Edit if branding is already set up.
Upload a banner logo (recommended size: 280×60 pixels, ≤10 KB) and a background image (recommended 1920×1080 pixels, ≤300 KB). You can also specify a solid background colour using a hex code.
Add welcoming text such as “Welcome to Contoso File Transfer Platform” and a username hint like user@contoso.com.
You may add additional languages by clicking Add language and customising images and text for each locale.
The screenshot below shows the company branding page with a Zapper Edge logo uploaded:
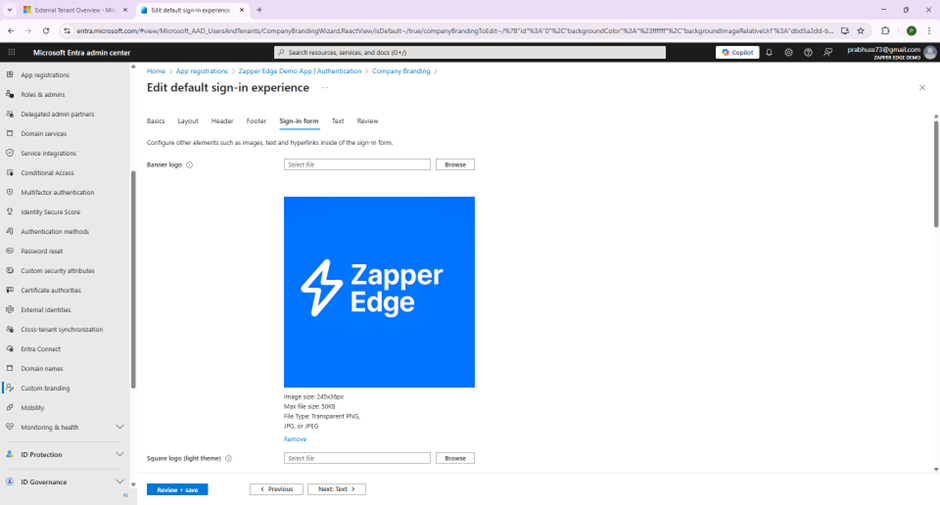

Company branding page with the Zapper Edge logo loaded as the sign‑in banner
Testing and next steps
Once the environment variables are set, open a new browser and navigate to your Zapper Edge URL. You should see the sign‑in page from your Entra ID tenant. If you created a user flow, click Run user flow to walk through the sign‑up/sign‑in process and verify that claims such as display name and email are returned.
To summarise, the journey looks like this:
Deploy Zapper Edge from the Azure Marketplace.
Use the default shared tenant for immediate access.
Create your own Entra ID tenant and application.
Update three MSAL environment variables in Zapper Edge.
Optionally customise branding and user flows.
As a business owner, you now have the power to control who signs in to your file transfer platform, how they do so and what they see. This guide helps you get there with clear, actionable steps. If you run into issues, check the values you recorded from the application overview page and make sure the environment variables are set correctly. For more assistance, contact Zapper Edge Support at contactus@zapperedge.com.