
Deployment Guide – Zapper Edge Managed File Transfer Platform
Document purpose
This guide walks you through deploying the Zapper Edge Managed File Transfer Platform from the Azure Marketplace. Each section explains the fields you need to complete, the options available, and includes the relevant screenshots from the Azure portal. By the end of this guide, you will have a running Zapper Edge Managed File Transfer (MFT) instance in your own Azure environment.
Introduction
Zapper Edge MFT is a secure, scalable managed file‑transfer solution built on Azure. It combines enterprise‑grade security with high‑speed file sharing and auditing. Zapper Edge delivers a managed platform with the following benefits:
Enterprise‑grade encryption: Data at rest is encrypted with AES‑256, and communication uses TLS 1.2+.
Compliance ready: Features such as RBAC, MFA and audit logging help meet industry regulations (HIPAA, SOC 2, GDPR and others).
Flexible file exchange: Support for SFTP, large file streaming and resumable sessions.
Low‑code integration: Exposes REST APIs for integration with your existing applications and workflows.
Deployment is performed through an Azure Marketplace “Managed Application”. This provisions all required resources, including the web app, App Service plan, PostgreSQL database, Key Vault and Azure Container Apps used for large zip downloads. You simply fill in a few parameters and click Create
Prerequisites
Azure subscription: You need an active subscription with rights to deploy resources. If you are deploying into a subscription provided by your organisation, ensure you have the necessary permissions.
Resource providers registered: Zapper uses multiple Azure resource types. Before starting, verify that your subscription has registered the following providers: Microsoft.Solutions, Microsoft.Resources, Microsoft.KeyVault, Microsoft.DBforPostgreSQL, Microsoft.Web, Microsoft.ContainerRegistry, Microsoft.ManagedIdentity, Microsoft.Network, Microsoft.Compute, Microsoft.Storage, Microsoft.OperationalInsights, Microsoft.Insights, Microsoft.App and Microsoft.EventGrid.
You can register them via Azure CLI:
az provider register --namespace Microsoft.Solutions
az provider register --namespace Microsoft.Resources
# ...repeat for the other namespacesEntra ID application (optional): For single sign‑on the template uses a default MSAL (Microsoft Authentication Library) application. you should use your own Entra ID tenant and client ID, you can replace the values in the Entra ID Configuration step. For Testing purpose leave the defaults.
Step 1 – Start from the Azure Marketplace
Open the Azure portal and search for “Zapper Edge Managed File Transfer Platform” in the Marketplace. The product page describes the service and lists subscription plans. Make sure your desired Subscription is selected and click Create to begin the deployment (see Figure 1)
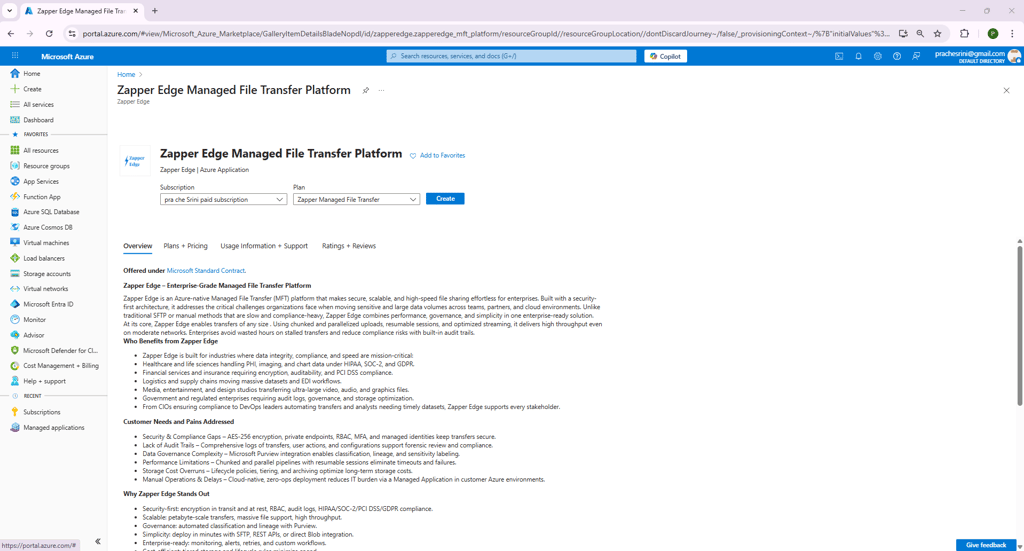
Figure 1 – Marketplace listing for Zapper Edge Managed File Transfer Platform.
Step 2 – Basics
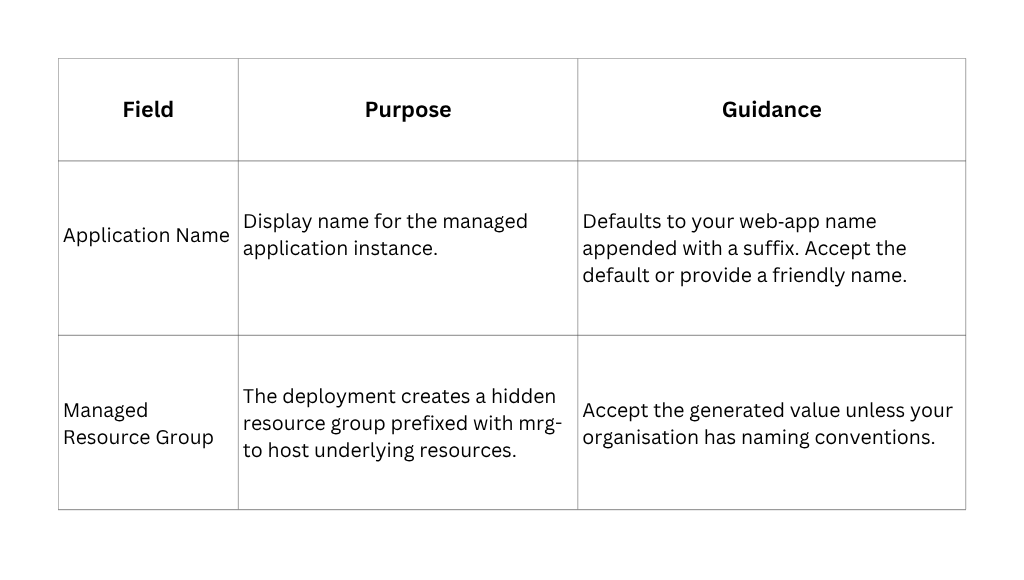
After clicking Create, you arrive at the deployment wizard. The first tab, Basics, collects high‑level information about where to deploy the managed application (Figure 2). Fields marked with an asterisk are required.
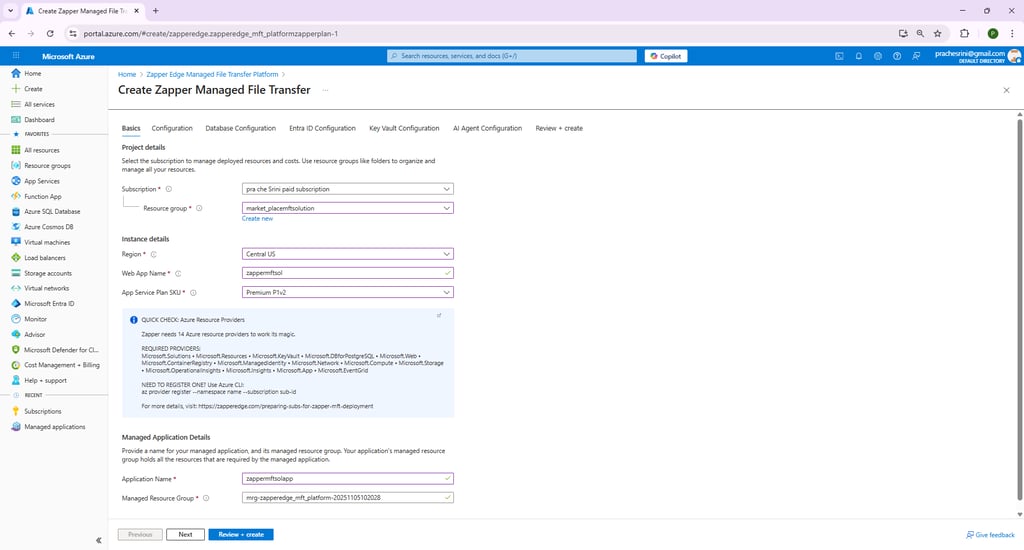
Figure 2 – Basics step for Zapper Edge MFT.
Project details
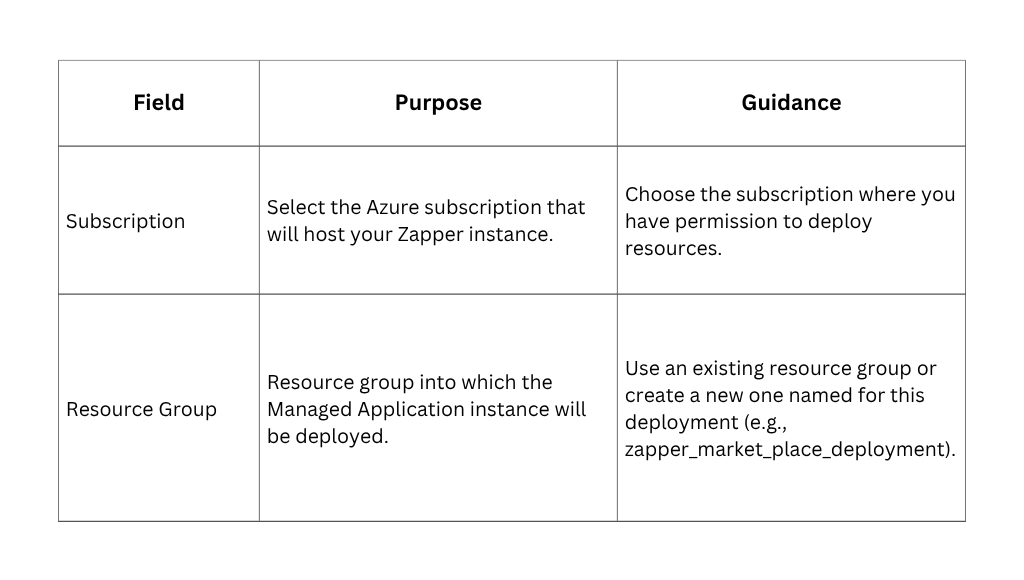
Instance Details
Managed Application Details
Once you have filled in the Basics fields, click Next to continue.
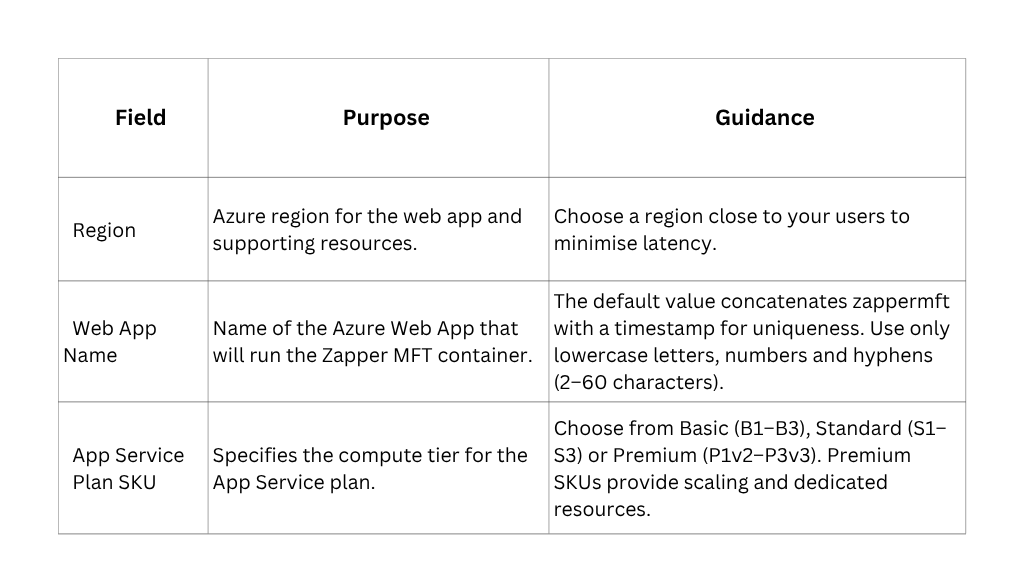
Step 4 – Database Configuration
The Configuration tab sets parameters specific to Zapper (Figure 3). A warning reminds you to ensure all required resource providers are registered before continuing.
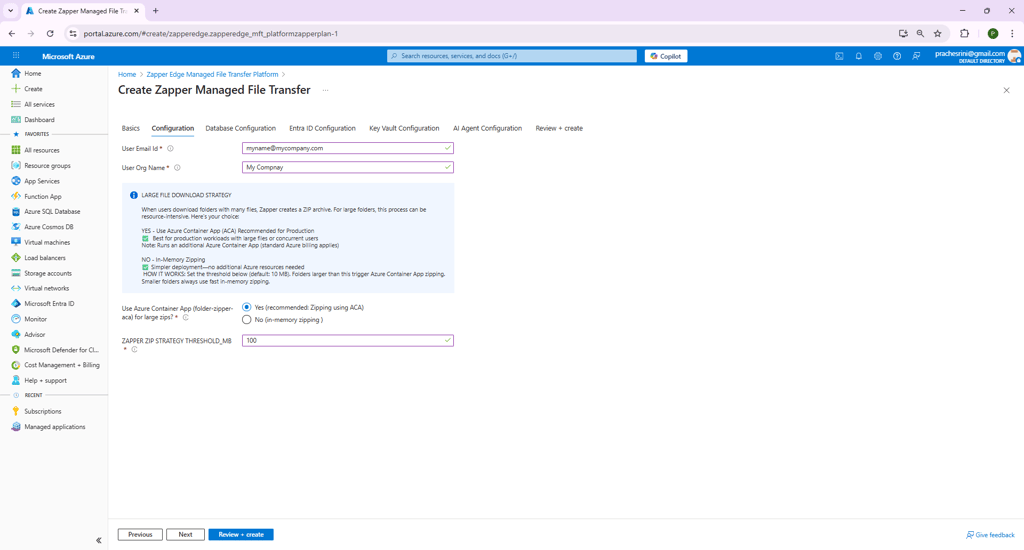
Figure 3 – Configuration step.
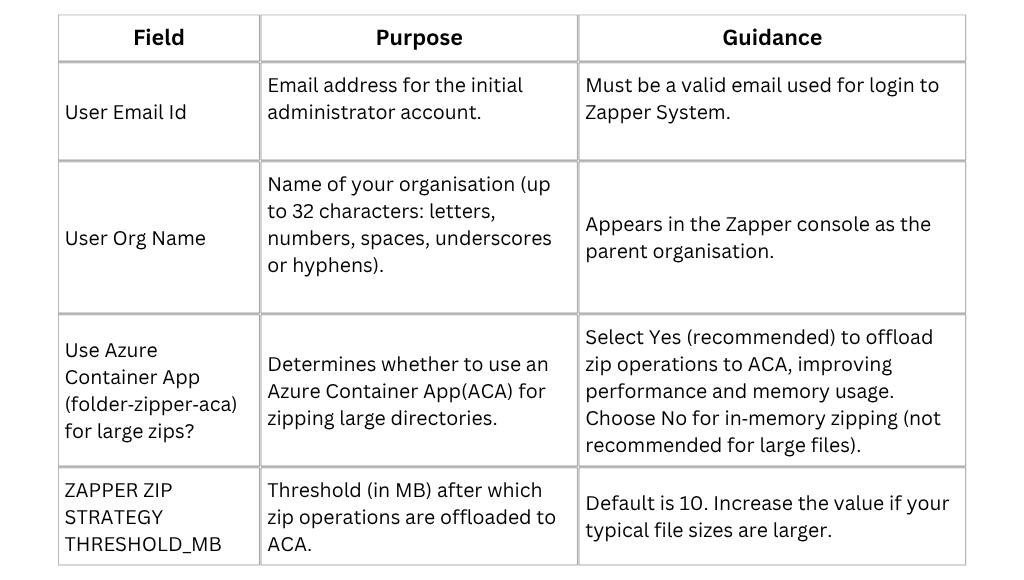
After completing these fields, click Next to configure the database.
Step 3 – Configuration
Zapper requires a PostgreSQL database for metadata storage. In the Database Configuration step (Figure 4), you can either supply an existing PostgreSQL connection string or have the template provision a new server.
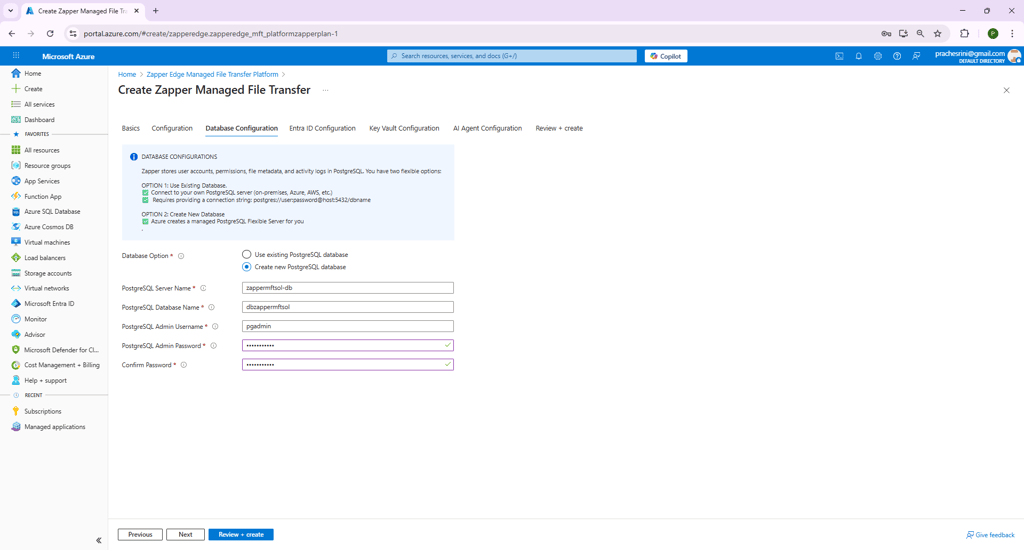

Figure 4 – Database Configuration step.
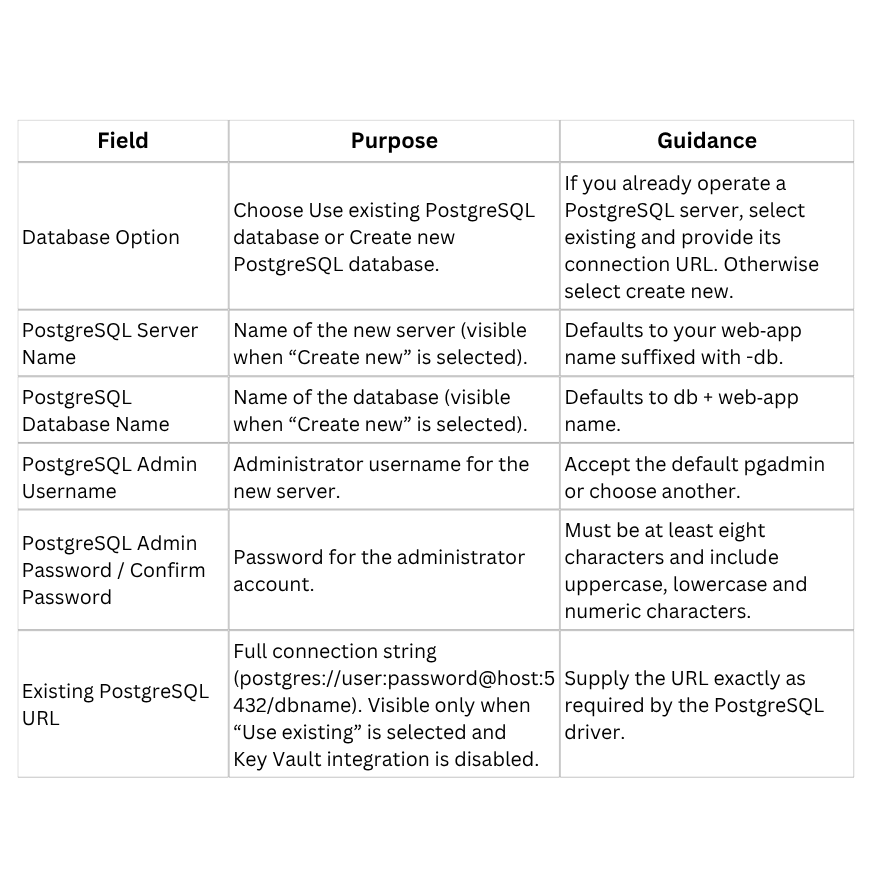
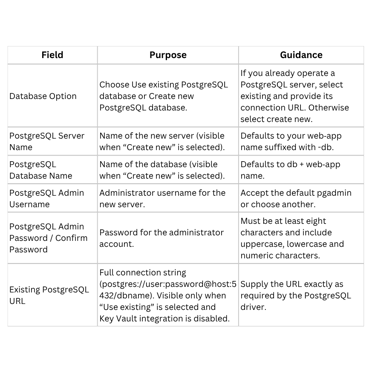
When your database settings are complete, click Next.
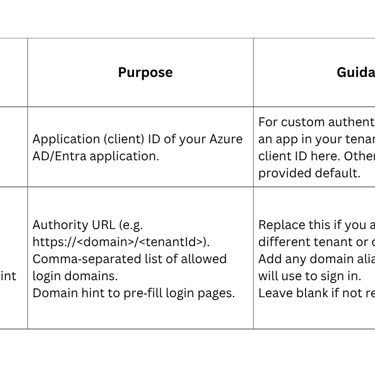
Step 5 – Entra ID (Azure AD) Configuration
Zapper uses Microsoft identity for authentication. The Entra ID Configuration step lets you specify the client ID and authority used by the MSAL library (Figure 5). If you do not have your own Entra ID application, you can accept the defaults.
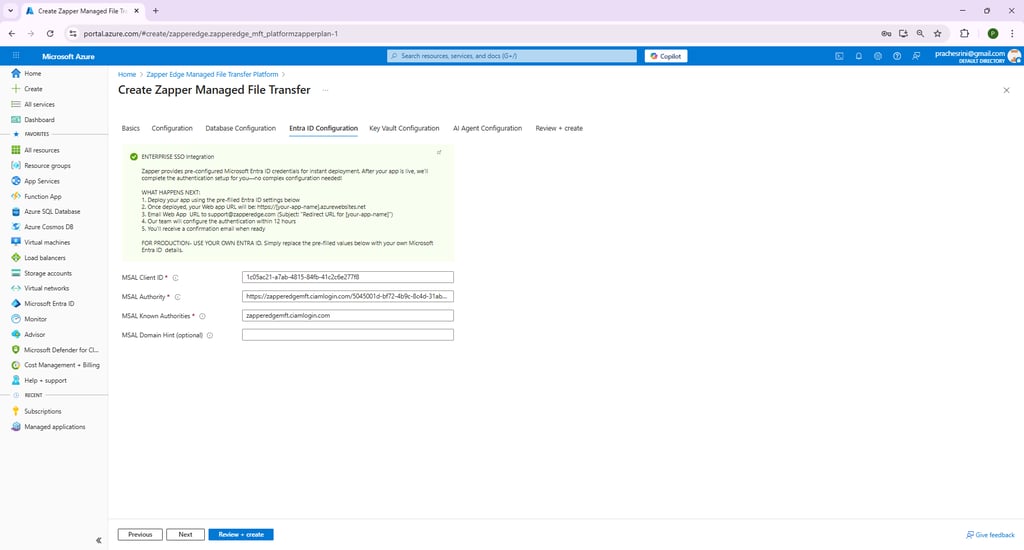
Figure 5 – Entra ID Configuration step
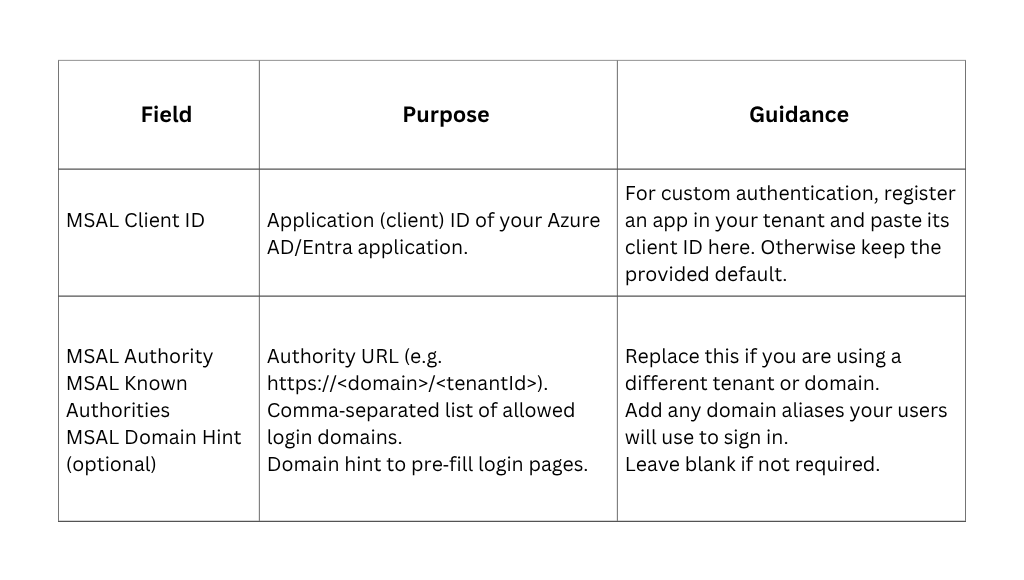
After specifying your identity settings, click Next to configure the Key Vault.
Step 6 – Key Vault Configuration
Zapper can store the database connection string securely in Azure Key Vault. This step determines whether the application reads the DB URL from Key Vault at runtime (Figure 6). If you choose Yes (recommended), the deployment will either create a new Key Vault or use an existing one and add your connection string as a secret. If you choose No, the connection string is passed as an environment variable and not stored in Key Vault .
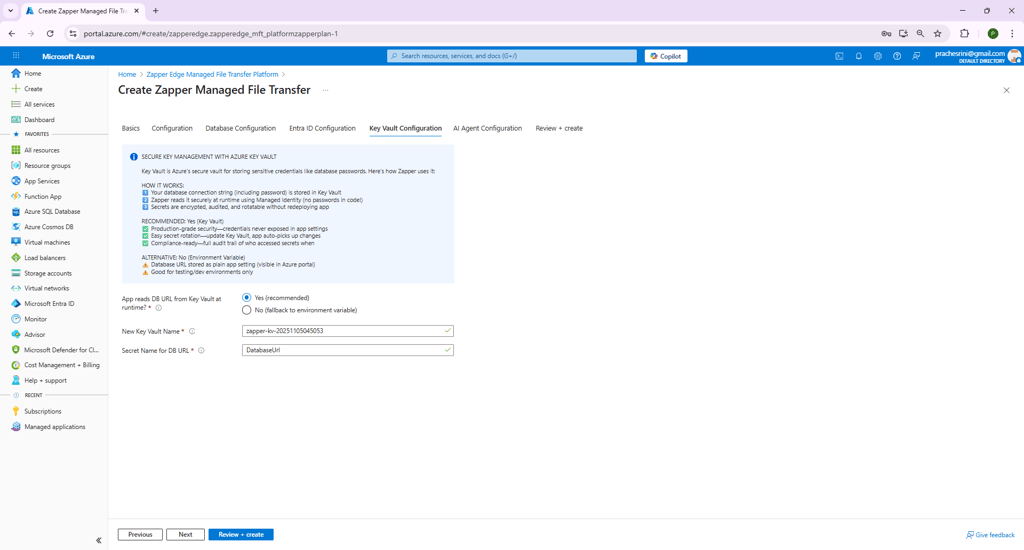
Figure 6 – Key Vault Configuration step.
When Key Vault is enabled:
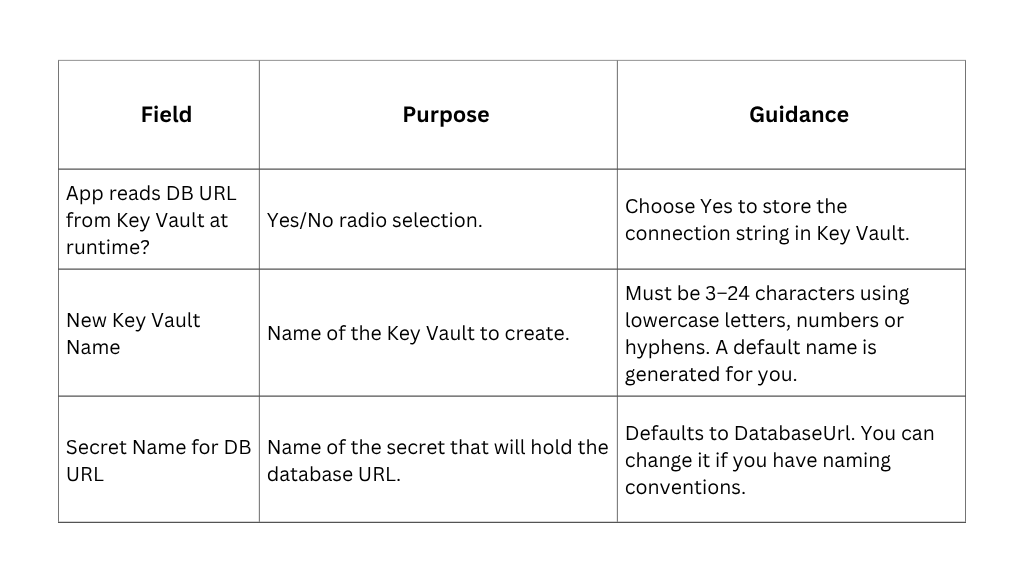
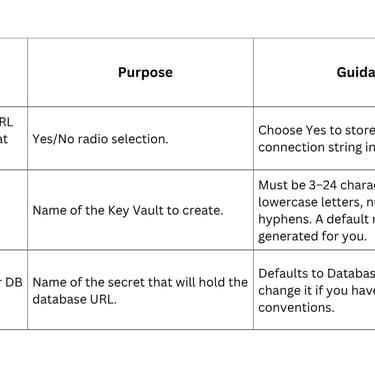
If you choose No, there are no additional fields; the connection string will be passed to the web app as an environment variable.
After selecting your Key Vault preferences, click Next to review your configuration.
Step 7 – AI Agent Configuration
The AI Agent Configuration step introduces an optional AI‑powered file‑processing feature. When enabled, users can manually trigger the AI agent to analyse or transform files stored in your configured storage accounts. This capability is ideal for on‑demand processing and user‑initiated operations. Leave it disabled if you do not require these capabilities.
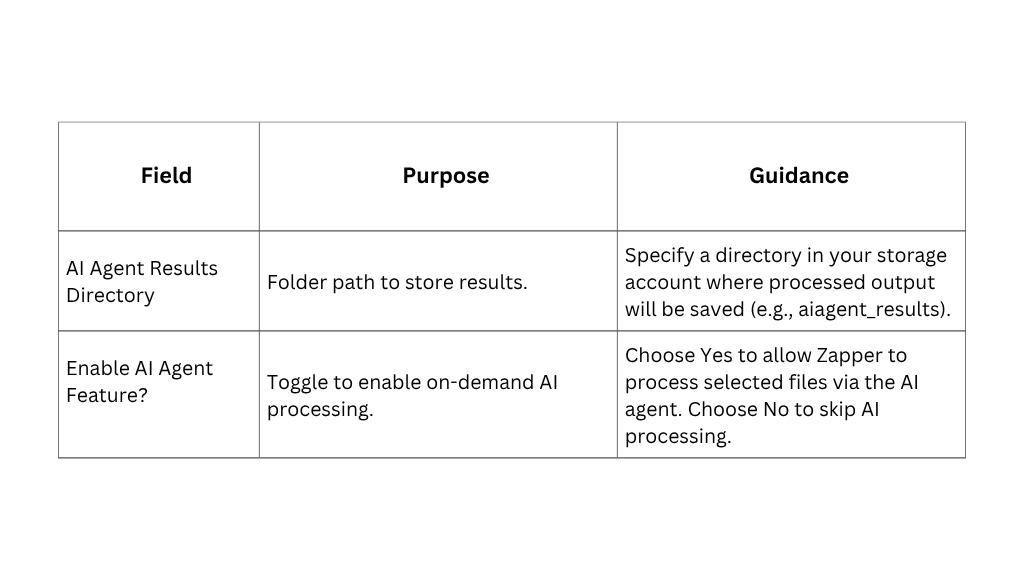
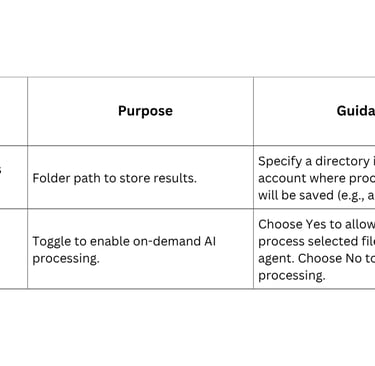
How it works:
User selects a file and clicks "Run AI Agent" in the Zapper UI.
Zapper calls the AI service API and sends the file for processing.
Processed output is stored immediately in the specified results directory.
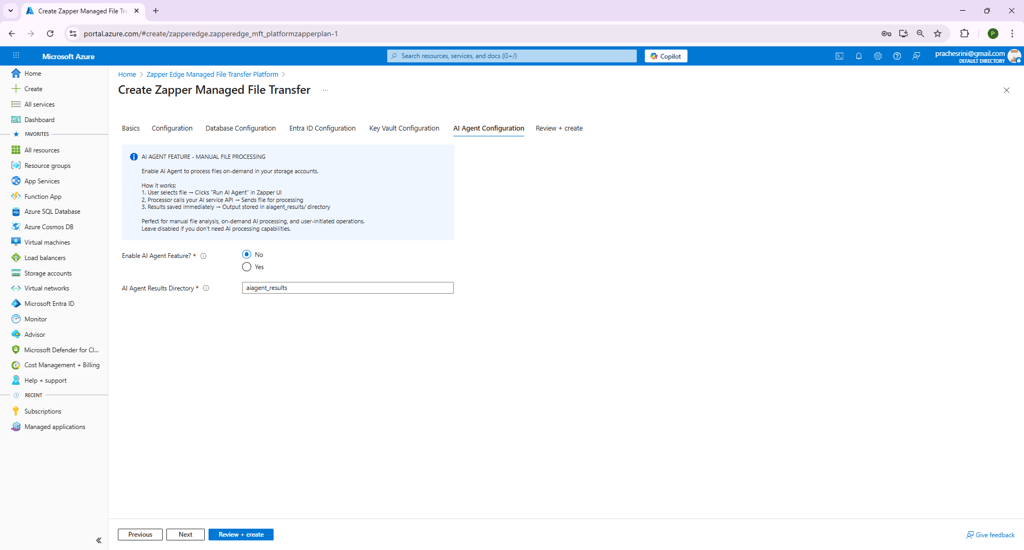
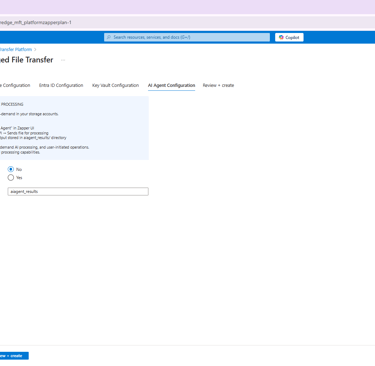
Figure 7 – AI Agent Configuration step.
Perfect for manual file reviews and ad‑hoc AI processing, this feature lets you leverage AI without additional infrastructure. You choose whether to enable it and where processed results will be written.
Step 8 – Review + Create
The final tab summarises all 8 parameters you entered. Take a moment to review each section – Basics, Configuration, Database, Entra ID Configuration and Key Vault – to ensure correctness. At the top is a checkbox indicating you agree to the terms and conditions of the marketplace Check this box and when you are ready, click Create to start the deployment.
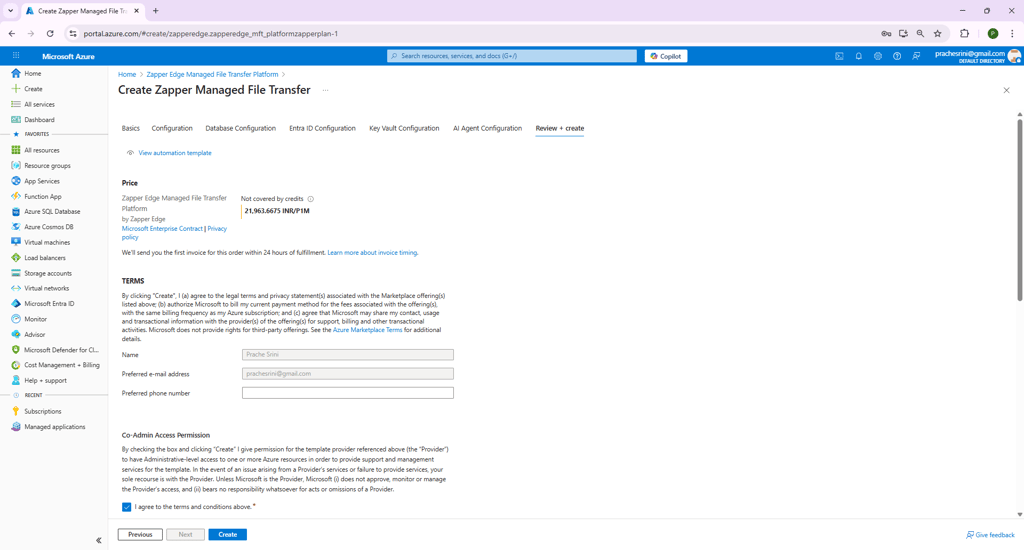
Figure 8 – Review + create step.
The deployment engine will validate your inputs, create or update resources and deploy the Zapper container. This process may take several minutes. You can monitor progress from the Azure portal’s “Deployments” blade. Once complete, your managed application’s overview page will provide a “Web App” link. This link opens the Zapper MFT UI.
Post‑deployment tasks
1. Manage Web App: During deployment you specified a User Email Id. will have “super user” privileges, allowing you to manage users and connectors.
2. Scale as needed: If file throughput increases, you can scale your App Service plan to a higher SKU (e.g. from Basic to Standard) from within the Azure portal. Similarly, upgrade the database or container app resources if you see throughput constraints.
Deploying the Zapper Edge Managed File Transfer Platform through Azure Marketplace requires only a few inputs and can be completed in minutes. This guide walked you through each configuration step with screenshots and context. After deployment, you will have a secure, scalable managed file‑transfer solution integrated into your Azure environment, ready to onboard users and start exchanging files.